
Another Day at Work

Apis Workers' Party

Predator

Some of Your Beeswax

Sedum Bumbler

Look of Defiance

Chicory Bee

Bumbling Bees

Garden Cafe

Buzz By Here - To Infinity and Beyond

Pick Your Poison

Blind Side Attack

On a Mission

Honey Bee on Sedum

Covering the Cosmos

Center of the Cosmos

Three's a Crowd

Popular Spot

On A Pedestal

Big Harry Fireworks Display

To Impress the Girl

Different Perspective

Sweet Ride

Perfect Little Piggies B&W

Flipping the Light Fantastic

Festival of Flights

To the Crowd's Delight

Amish Go Round

Wondersome One

The Stars In Her Eyes

Tuesday's Child

Sleeper Hold

Considering the Next Move

Sugar and Spice

Front Porch Portrait

Caged Competitor

Early Adoration

Child In the Ligtht

Stroll Through the Weeds

Attention Grabbing

Eye Contact

On the Line

Eyes of Wonder

Rounding the Curve

Troubadours of Basin Spring Park

Down by the Creek

Sun Day

Catching Some Light

EAA Fireworks

Hear Me Roar
Photo Restoration – Before & After
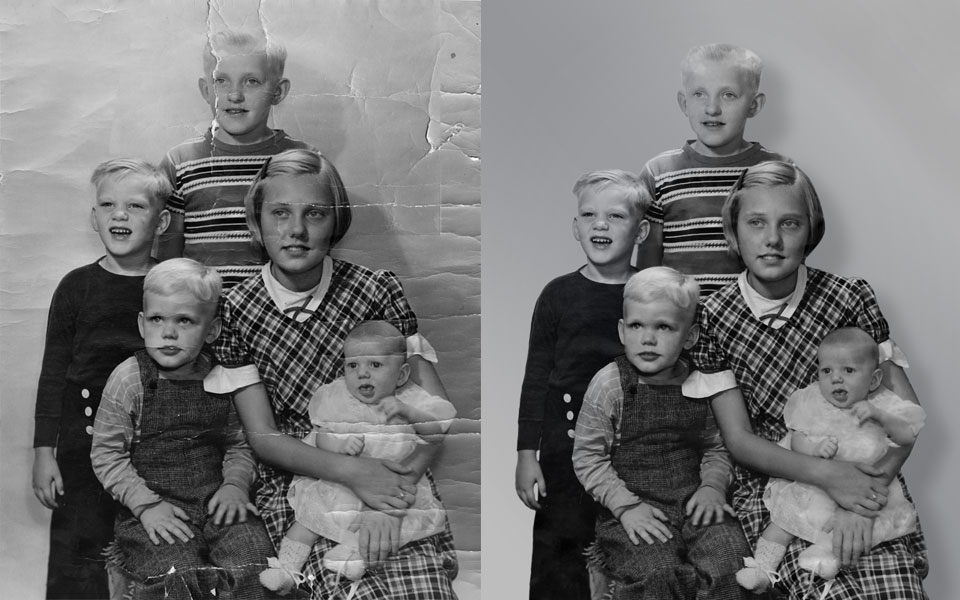
Chalk this one up to the magic of Photoshop and hours and hours and hours and hours of tedious work.
The background story: A good friend came to me with this photo and asked if I could fix it. The photo is a little more than 50 years old. The subjects are siblings that were separated shortly after this picture was taken – I believe, due to the death of one or more parents. My friend’s father (little boy in the overalls) is the one who had the original, and only known copy. It was recently discovered rolled up and literally falling apart. My friend wanted to have it restored, as much as possible, and present it as a Christmas gift to his dad.
The original was a bit smaller that 16×20 inches. It had been printed on a thick paper that time had made very stiff and brittle. My first step was to scan it and create a digital file that could be manipulated in Photoshop. The My scanner will only scan 8.5×11 inch images. To get the full photo I had to make multiple scans of it, being sure my scanned images would overlap. The photo itself presented a lot of problems, because of its stiffness and the areas of major wrinkles actually had small small pieces of the image that were falling off. That stiffness also prevented the image from laying flat on the scanner. I was very worried about damaging the original just by unrolling it.
After scanning was complete, I had to join all the pieces of the puzzle to come up with the image you see on the left. (Actually, some work had been done to it try to even out the tone and remove the tiniest of wrinkles before I saved the “before” image you see here.)
Once I had the “before” view you see above, it was a matter of removing the big wrinkles and recreating some of the areas where the image had flaked off, like on the boys knee or the tall boys face and neck.
When I first saw the photograph, I wasn’t sure how good I could make it look. Trust me, the “before” image doesn’t do it justice. I actually took on this project to test my own skills – to see if I could really do it.
After the multiple hours of eye straining work, I think it turned out pretty good. I’m not completely pleased with it, because I can see plenty of other things that need to be fixed. I would have also liked to work more on the background. Time decided for me, when the project was complete. I had worked on it when I could, for several months, and stopped the week of Christmas, so I could get a 16×20 print made for the gift.
I learned a bit through the process and honed my Photoshop skills as well. The greatest lesson learned? Do not take on another project like this unless… 1) you have a lot of time…and… 2) someone is paying you a boatload of money. Now that I know I can do it, that challenge is not as motivating.
Final word: My friend presented gave his father the photo for Christmas and everyone was delighted and amazed by how good it looked. I also gave him the file on a CD so they can print more copies for the other family members.
I consider it a happy ending.
You can get a closer look at this side-by-side image by clicking on it.


One Response to Photo Restoration – Before & After